First of all remember that this freeze takes blood (literally), sweat and tears to learn. So if you're the type that doesn't dedicate himself/herself to what he/she is doing it will take you enormous amounts of time to be able to stay poised in this freeze.
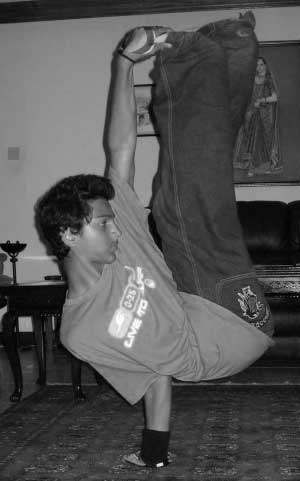
Airchairs, one of the most stunning freezes out there. If you don't know what it looks like:
One thing you should know is that the airchair is mainly about balance and flexibility. Balance is gained by executing it with the correct technique (which you gain through practice). And flexibility, mainly back, shoulder, and hamstring flexibility.
Stretches
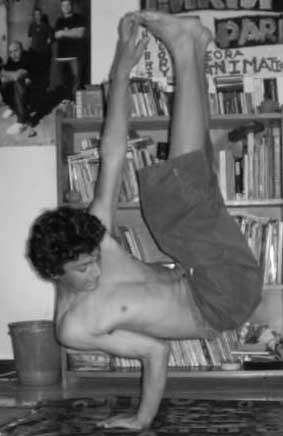
Hamstring Flexibility: Hamstring flexibility allows you to pike your legs. Piking is bringing your legs (legs have to be straight) close to your body.
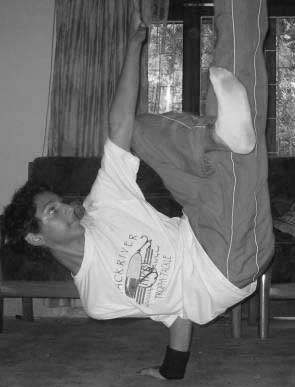
Piked Airchair vs Unpiked Airchair:
Static Stretches
Toe Touches
Static Stretch 1
1: Sit down with your back perpendicular to the ground, right leg straight and left leg bent at the knee with the foot beside your right legs thigh.
2: Reach for your right legs toes. If you can, try to put your head to your knees or shin.
3: Repeat stretch for your left leg.
Static Stretch 2
1: Lie down on the ground. Legs and back straight.
2: Get your back perpendicular to the ground.
3: Now reach for your toes, if you can try to put your head to your knees or shin.
If you’ve just started working on these and they are hurting you a bit, do 1 set of 10 seconds before practice and 2 sets of 10 seconds after practice. If you can put your head to your knees or shin then increase the time to 20 seconds.
Active Stretch
This stretch can really hurt, but its probably the best stretch there is for piking airchairs. Just ignore the pain.
1: Sit down with you back to a wall, legs straight and back perpendicular to the ground, parallel to the wall.
2: Lift up your right leg. Keep it straight. Try to touch your head to your knee.
3: Remember to keep your back straight and parallel to the wall.
4: Repeat stretch for your left leg.
If you start to feel a burning sensation on a muscle beside your knee, that means you tore a muscle. That’s a good thing. If you tear a muscle it grows back stronger. But usually this ‘burning sensation’ is really painful, so drop your leg straight away once you begin to feel it.
As I stated earlier this stretch is really painful, so before practice do only one set of 10 seconds. Do 2 sets of 10 seconds after practice. If you are the flexible type then do 2 sets of 20 seconds.
Shoulder Flexibility
Without shoulder flexibility you won’t be able to stab an airchair.
Shoulder Stretch 1
The Chair freeze, this is basically an airchair with your head and feet on the ground. This is for a chair on your right hand.
1: Go into a baby freeze.
2: Shift your legs over, so your left leg is bent at the knees and the foot is on the ground, and your right leg is bent at the knees but the foot is placed on your left legs knee.
3: Pick your self up a little with your free hand and your left leg.
4: Quickly stab your right hand onto your back.
5: Lift up your free hand.
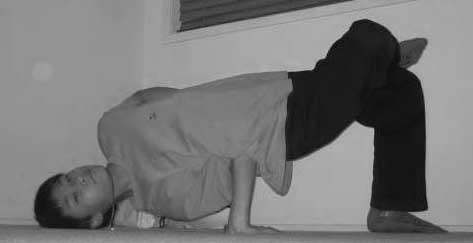
Chair Freeze
Ok this freeze is really easy you can get it within a day or two if you put your mind to it. To develop shoulder flexibility just sit in your chair (pardon the pun). Stay poised in your chair freeze for maybe 30 seconds at a time. You can do these basically anywhere, you can watch TV in them, you can play Game Boy in them etc. Just do these a lot.
Shoulder Stretch 2
I find this stretch a much better stretch than the chair freeze, as it also gets you used to the airchair position. Remember that where you stabbed on the chair freeze is where you shall stab for your airchair.
1: Stab your elbow into your sweet spot on your back. Use your free hand to stay balanced if you are having trouble to without it.
2: Lift your legs onto a couch, maybe 1.5 feet off the ground. With the aid of your free hand stay balanced.
3: Lift your free hand off of the ground and balance solely on your stabbed hand. This might take some getting used too, as this is the airchair position. Stay in this position maybe 30-40 seconds. It’s not very hard to hold because of your legs on the couch. Just like the chair freeze you have a free hand, so you can play Gameboy, watch TV etc. Just enjoy yourself!
Back Flexibility
Back flexibility is mainly so you don’t hurt your back with your stabbed hands elbow, as all of your body’s weight will be on it.
Forearm Hollows
Just jump into this position for a while. Don’t worry these are so much easier to hold than normal hollows. Hold these for like 15-20 seconds. Do 1 set before practice and 2 sets after practice.
The Actual Airchair Guide
Ok I would advise you, if you can to try and practice this everyday. For maybe 20-30 minutes. If you can do it in front of a mirror, or better yet record yourself; to see how you’re doing. Try to end each practice with you feeling a feeling of accomplishment; don’t stop because you’re tired. Stop once you are feeling you have done something well i.e. the airchair. Trust me on this one; it REALLY helps.
Airchair from squatting
1. Crouch down with your knees bent and your thighs resting on your calves.
2. Place your elbow in your sweet spot.
3. Lean back and put your hand on the ground, slide your legs forward so you aren’t compact.
4. Shoot your legs up straight, you can try to grab your toes if you want. But remember not to lean forward to do that, otherwise you’ll fall forward. Instead bring your legs closer to your hands, instead of bringing your hand closer to your legs.
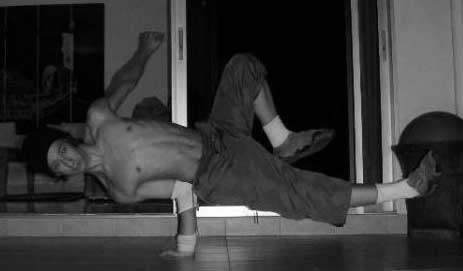
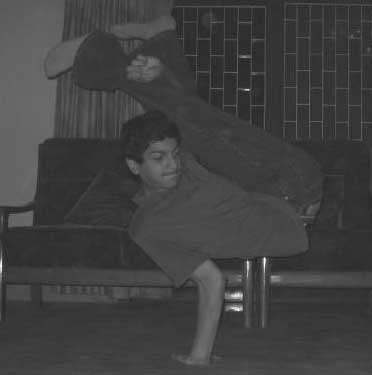
Leaned Forward Airchair vs Leaned Back Airchair:

5. Try to fall back down the same way you came up, you can jump out of airchairs by shooting out your legs and moving them in an arc towards the ground. You can choose to do either the leaned back or leaned forward way, the leaned forward way seems easier. But it’s much harder to hold than the leaned back. You don't have to pike your airchair if you wish. If you aren't going to pike then change step 4 to:
4. Make your torso parallel to the ground, and slowly lift your legs shifting weight to your stabbed hand. These type of airchairs are much much easier to hold than piked airchairs. If you are planning to do it this way then remember to place your elbow in the middle of your back; but if you are planning on piking your airchair then place it lower on your back.
Practice, practice, practice and you will find your equilibrium, record yourself to see your mistakes or just session somewhere where there are lots of mirrors that you can see your 'whole body' in.
Soon enough you will have some sexy airchairs!
Once you're comfortable with the normal piked airchair, begin working on variations:
Cross-Legged Airchair vs Airchair Double Variation:

Unstabbed Airchair
*Gasp* But how? It's not that hard guys. Mostly flexibility. If you can kick yourself in the head then it won't be a problem. That's not recommended though, but go ahead, tape it if you can. Haha. Basic tips needed for this skill are:
1. When bringing your legs up and grabbing your toes take it a step further and wrap your arm around one of your legs. The one that is on the same side as your stabbed hand is best.
2. When you have grabbed your leg PUSH UP! I can't tell you how important this is. Push up and back at the same time, this assures balance.
3. Try not to bring your head forward, you'll look like a retarded turtle and you'll fall forward. Instead, keep it back. Bring your legs to your head, not your head to your legs. It'll look better like this, trust me.
4. Again, flexibility. Hamstring flexibility is the main factor. Not flexible? Stick to the stabbed. Get flexible.
Unstabbed Airchair:
FAQ
Q: If I got CCW can I do the airchair with my right hand?
A: Yes, of course you can. But it all comes down to difficulty. If you're doing a flare going CCW and then you want to transition into an airchair onto your right hand it would be pretty dang hard; if you were going CCW and decided to do it on your left it would be significantly easier. It might look better transitioning into opposite arms, but then again, not everyone is a Baek.
Q: I keep falling backwards when I try to go into an airchair, what can I do? I keep falling forwards when I try to go into an airchair, what can I do?
A: Airchairs are all about balance and being able to find your equilibrium. If you're falling backwards then you should stab back more, if you're falling forwards then you should stab more into the front. It's all about balance. Imagine yourself as a see-saw, when nobody is on it then it will balance perfectly, it's being held up right in the center. Now, if someone went on one side then it would fall on that side. Just like this you need to evenly balance your weight out.
Q: I can't find my sweet spot, help?
A: Okay, first you need to realize that it's YOUR sweet spot. It's not something I can magically point out to you. I'm no leprechaun. You'll have to find it on your own. I have included a video of VP holding an unpiked airchair for a while from different angles. It should help you.
Q: How long did it take you to have consistent airchairs?
A: If by consistent you mean being able to hold for a while then I would say around 3-4 months. In the first month I got used to that position and then I got around to actually holding something.
Shiite, the colors look ghey max. Haha.
Have fun. Silly ninjas.